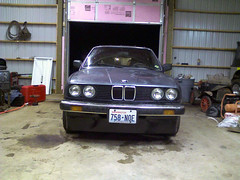
Friday night I headed down to Ocean Shores in the BMW, broken wheel bearings singing the whole way. The goal for Saturday didn’t seem very ambitious but, in retrospect, turns out to be insane. We wanted to replace both rear wheel bearings (really important), replace the torn CV boot, change the transmission fluid, mount the fire extinguisher, and maybe have time for a few extra fun things. We got started around 11:15 and our pain became obvious quickly.
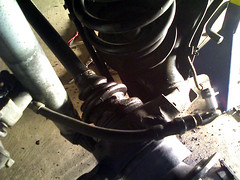
We got the wheel, brake, and emergency brake off quickly. Then we had to take out the rear axle and CV joint assembly. There are 6 bolts that hold the assembly to the differential (black round bolts with a hex head key hole). 5 of them came off with no problem, however the 6th one decided it would round out the hex. It took about 10 minutes and attempts with several tools but eventually Robby used his hulk like strength and gigantic vice-grips to break it free. Good for now, but now we were short a bolt. With the axle assembly out, it was time to remove the axle-stub and then the wheel bearing, we would worry about the CV bolt later.
Robby pounded on various parts with a BFH (big fucking hammer) and a brass punch for, I don’t know, a hour and we just could not get the axle-stub or wheel bearing to come out. Robby looked around and saw that behind the axle-stub, there was a C-shaped pressure spring/ring. We decided we needed to try and take that out before pounding anything else out. Robby’s tools for removing that pressure ring were meant to be used on something that wasn’t so obscured behind a part (e.g. straight on or at a slight angle).
We headed to our local (kind of) auto parts store to replace the stripped boot screw, get right-angled spring clip removers, and possibly find a CV boot. Oh yeah, I forgot to mention we found out the CV boot kit that came in the mail was meant for the inside boot, not the outside; so we needed a CV Boot too. The local store didn’t have anything we needed. So, off to Aberdeen we went. We stopped at Schuck’s and got the tool we needed. Then we drove all the way to end entrance of Aberdeen (pretty much as far as you can go and not be in Central Park) to Ace Hardware only to discover that Ace didn’t have a bolt that matched up. There was something close, but it wouldn’t work because the bolt was too long and the blank part of the shaft was too long. Fortunately, I brought my tap and die set, so we bought 3 of them and prayed I could make it work. Back to the bat cave (no CV boots anywhere)!
When we got back to the shop, we tried to get the clip out of the hole but, that’s right, there was a problem. The tool couldn’t open wide enough to get to both tools. I looked at the tool a bit and suggested to Robby that we grind out the center part of the tool so it could open further, he agreed, we did, and it worked. We got the spring clip out and then started pounding with the BFG and brass rod some more. It wouldn’t budge.
We gave up on being nice and decided to get the assembly red-hot. However, even torching it, it wouldn’t come out. We went online and found a guide but the guide just made it seem like the half-shaft could be pulled out with ease and then you could simply take off the pressure ring (Robby had the tool for that) with the axle-stub out. However, there was no steps for removing the axle-stub, just simply “now take the half shaft out and set it on the ground” — very funny. In frustration, I took a rubber mallet and started smacking the axle stub from the bottom at the same time Robby would hit it from behind with the punch. It moved! So, we just timed our strikes right and I swung harder and it came off smoking hot in 10 hits or so, pulling the existing wheel bearing in half. The inner ring was positively stuck to the axle-stub.
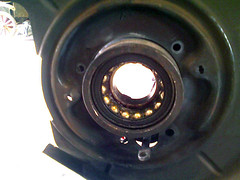
Then we had to get the rest of the wheel bearing out of the hole. Lots of heat, pounding, and blood (well, Robby’s blood) later, the wheel bearing came out. Then using the press we got the left over bearing off the axle-stub, cleaned it up and pressed the bearing on. Robby had the new bearing half way back into the car when I stopped him. We forgot to put the retainer spring back on before we pressed the wheel bearing onto the axle-stub. Some pressing, swearing, and whatnot later, we separated the axle-stub from the new wheel bearing and the new wheel bearing from itself — yeah, we thought we broke it, the seal got pretty bent. Well, we had to press on, so we got the other new wheel bearing out of the box, put the retainer spring on, then pressed the bearing on, and pounded the assembly into the car. Don’t worry, things didn’t go smoothly yet, we then realized we forgot to put the dust boot back onto the suspension arm. On some cars you can take these off with no problem, but BMW decided this would be a good place to hook the emergency brake spring to. Well, we didn’t have any more wheel bearings, so we cut the dust boot in half bolted it on and then we tack-welded it back together. Yay!
Now, we had to take care of the CV boots. After a long time searching online to figure out how to get axle apart and only finding guides telling us to replace the whole unit (dumb and expensive) we found a guide showing that we could just take off the inside shaft caps. We came up with the idea to use the boot kit to replace the part that it was supposed to even though it was broken and then take the rubber boot and use it to fix outer boot (the broken one). Anyway, this story is getting too long, so let me summarize. We were able to create a properly sized bolt, get the boots fixed, and get the assembly back together.
While we put the emergency brake on, Robby realized he didn’t remember exactly how it went back together. No problem, I just took the other wheel and rotor off. Robby looked at it and got everything put back together properly. While I was trying to get the caliper open, I popped open the bleeder to release the pressure and make it easy to pull back. No fluid came out and we then we found the brakes didn’t work properly. To make a long story short, we found out that the rubber brake line was blocked and the caliper was completely blocked as well (like 25 psi of air wouldn’t go through it blocked). We fixed it with some brute force and air pressure. Then we bled the brakes and they work now, hooray.
With the car all back together, after a quick test drive (revealing that we fixed the quieter of the two wheel bearings) we decided to do something fun. Being that it was already midnight, why not? Robby showed me some aluminum grain-stamped extremely thin aluminum siding. He then used his hemming tool to hem the aluminum on the top and bottom edges to make it a little bit stronger (though it was clear it wouldn’t be strong enough). We put the smooth side out, bolted it on, flared out the edges by the tires and painted it black. Interestingly enough, I got noticeably better gas mileage on the way home.
It flexes at speeds above 40 MPH, but we kind of figured it would. It’s just kind of a proof of concept. I think when we make the real one we’ll flare the bottom out more and we’ll get it closer to the ground. Also, the final product will have a splitter.
Oh, and for one last thing before I left, finally, we got the fire extinguisher mounted.